
Guide
Add a USB SSD to a Raspberry Pi 5 running Home Assistant OS
Published · Updated
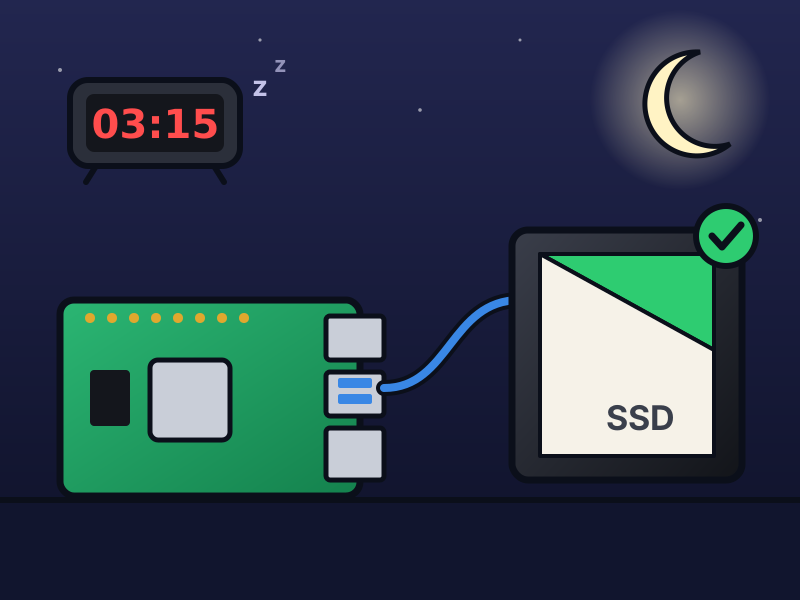
I was planning to run a lot of services on my Home Assistant Pi. I’d meant to give them a machine of their own, but the Pi 5 handles most of it well. The one part I expected to fail was the SD card, and I didn’t want all those services wearing it out.
I also wanted room for media, so I added a 120 GB SATA SSD in a cheap USB adapter. On Raspberry Pi OS that’s a ten-minute job. On Home Assistant OS (HAOS) it isn’t: there’s no shell on the host, the SSH app can’t see USB disks, and everything that matters (the kernel command line, udev rules, mount points) lives on the host. Then the adapter caused two problems. Three days in, it hung at 03:15 and the kernel took the disk offline. With UAS turned off, it hid the drive’s write cache, so Linux stopped sending cache flushes. The UAS fix is well known on Raspberry Pi OS. I couldn’t find the write-cache side or the HAOS side written up anywhere, so here’s all of it, and how the SSD ended up as Home Assistant’s own data disk.

The Pi 5. The blue ports are USB 3; power comes in on the USB-C socket at the bottom left. Photo: SparkFun Electronics, CC BY 2.0, via Wikimedia Commons.

What you need
Section titled “What you need”| Part | Mine |
|---|---|
| Raspberry Pi 5 running HAOS | 8 GB, HAOS 18.3 (kernel 6.18), booting from a 64 GB SD card |
| A 5 V 5 A power supply | The official Raspberry Pi 27 W USB-C supply |
| A 2.5-inch SATA SSD | WD Green 120 GB |
| A USB 3 to SATA adapter | UGREEN, about AU$14. Inside: a Realtek RTL9201, USB ID 0bda:9201 |
| A shell on the host | The community Advanced SSH & Web Terminal app, protection mode off |
My SSD is an old one I took out of a laptop, and it’s turned out really useful here. I bought the rest on AliExpress, the UGREEN adapter included.
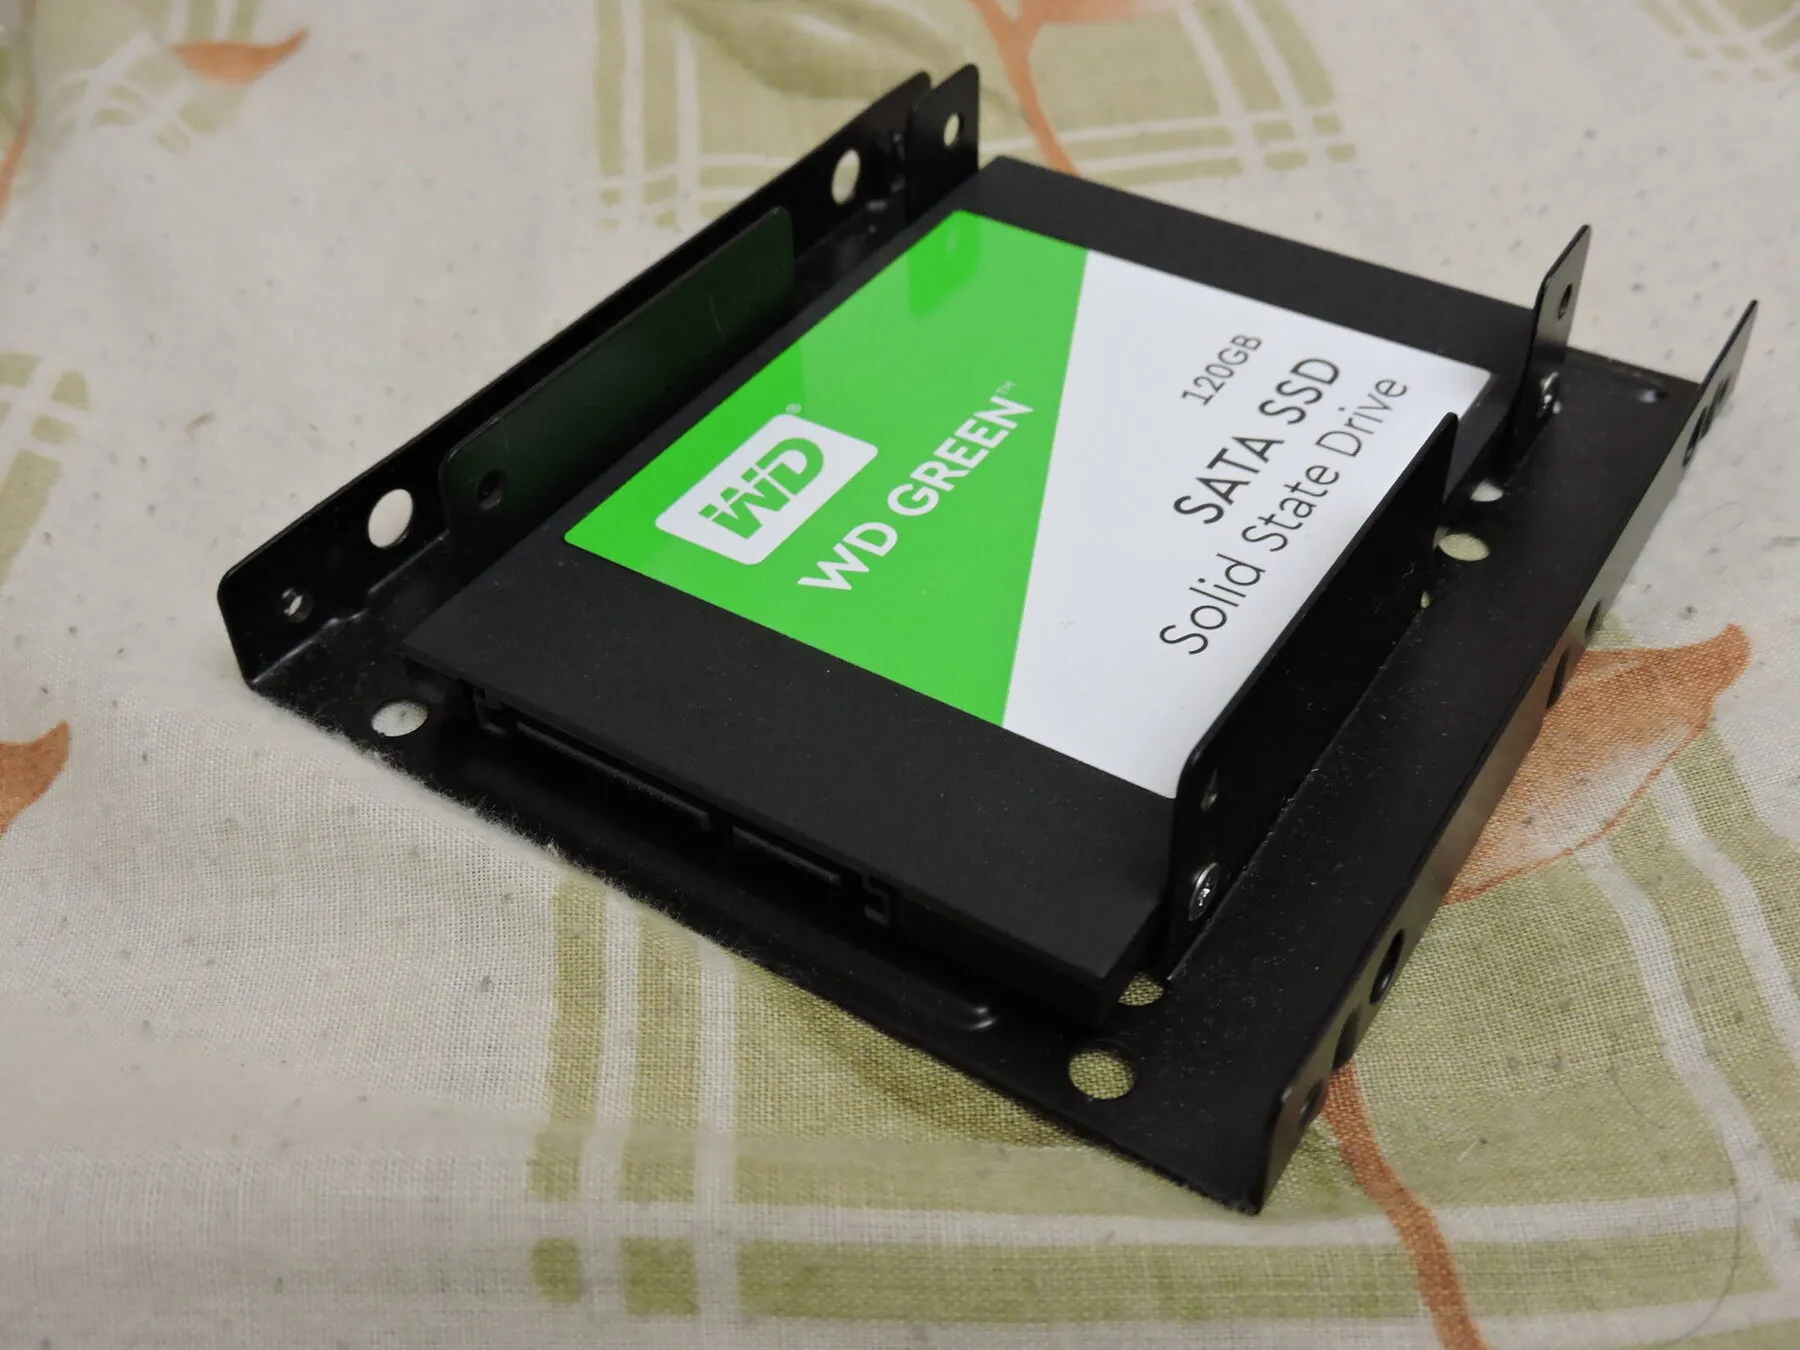
A WD Green 120 GB like mine (this one is in a desktop drive bracket, which you don’t need). Photo: Monoklon, CC BY-SA 4.0, via Wikimedia Commons.

Step 1: Reach the host from the SSH app
Section titled “Step 1: Reach the host from the SSH app”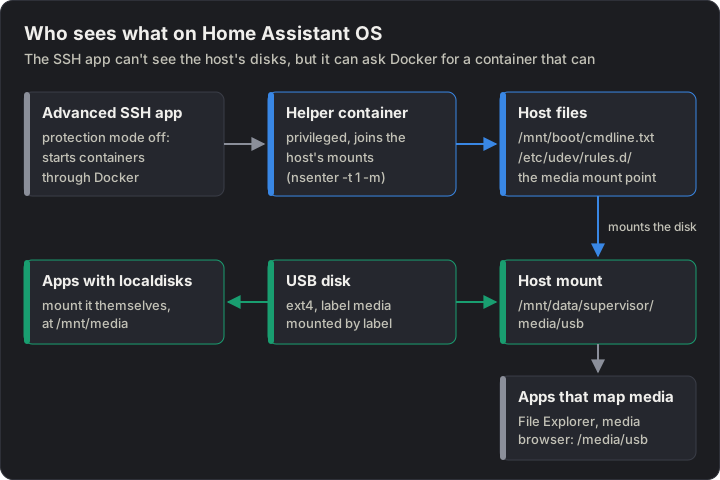
Who sees what. Blue: the helper container reaches the host’s files. Green: where the disk gets mounted.
HAOS runs everything in containers. Even with protection mode off, the Advanced SSH app has its own view of the filesystem: no /dev/sd*, no boot partition, no /proc/device-tree. What protection mode off does give it is the Docker API. So it can start a short-lived privileged container that joins the host’s mount namespace, and whatever runs there sees the host’s files. Run this as root in the SSH app (sudo -i):
IMG=$(docker inspect app_a0d7b954_ssh --format '{{.Config.Image}}')host() { docker run --rm --privileged --pid=host --network none \ --entrypoint nsenter "$IMG" -t 1 -m -- "$@"}host ls /mnt/boot- It reuses the SSH app’s own image, so nothing is downloaded. On older Supervisor versions the container is called
addon_a0d7b954_ssh;docker psshows the name. --pid=hostmakes PID 1 the host’s init, andnsenter -t 1 -mjoins its mount namespace, so the command runs with the host’s ownmount,blkid,chattr,udevadmandvcgencmd.
The rest of this guide uses host and IMG.
Step 2: Check the power
Section titled “Step 2: Check the power”The Pi 5 asks its supply over USB Power Delivery how much current it can give. With a 5 A supply it lets the USB ports draw 1.6 A in total; with anything else, 600 mA, and it won’t boot from USB. A 2.5-inch SSD and its adapter take about 0.3–0.5 A, and a 2.5-inch hard drive about 0.5 A, or 1 A while it spins up (specs, not measured).
The firmware records what it negotiated in /proc/device-tree/chosen/power/, which only the host can see:
for f in max_current usb_max_current_enable usb_over_current_detected; do echo "$f: $(host hexdump -v -e '1/1 "%02x"' /proc/device-tree/chosen/power/$f)"donehost vcgencmd get_throttledhost vcgencmd pmic_read_adc EXT5V_VMine read max_current 0x1388 (5000 mA: the 5 A profile), usb_max_current_enable 1 (the ports get 1.6 A), no USB over-current, get_throttled 0x0 (no undervoltage or throttling since boot) and 5.12 V on the input, with the SSD busy. Home Assistant’s own power check only reports undervoltage. If you have a Zigbee dongle, keep it on a short USB extension cable away from the SSD: USB 3 gives off 2.4 GHz noise.
Step 3: Find out which chip your adapter has
Section titled “Step 3: Find out which chip your adapter has”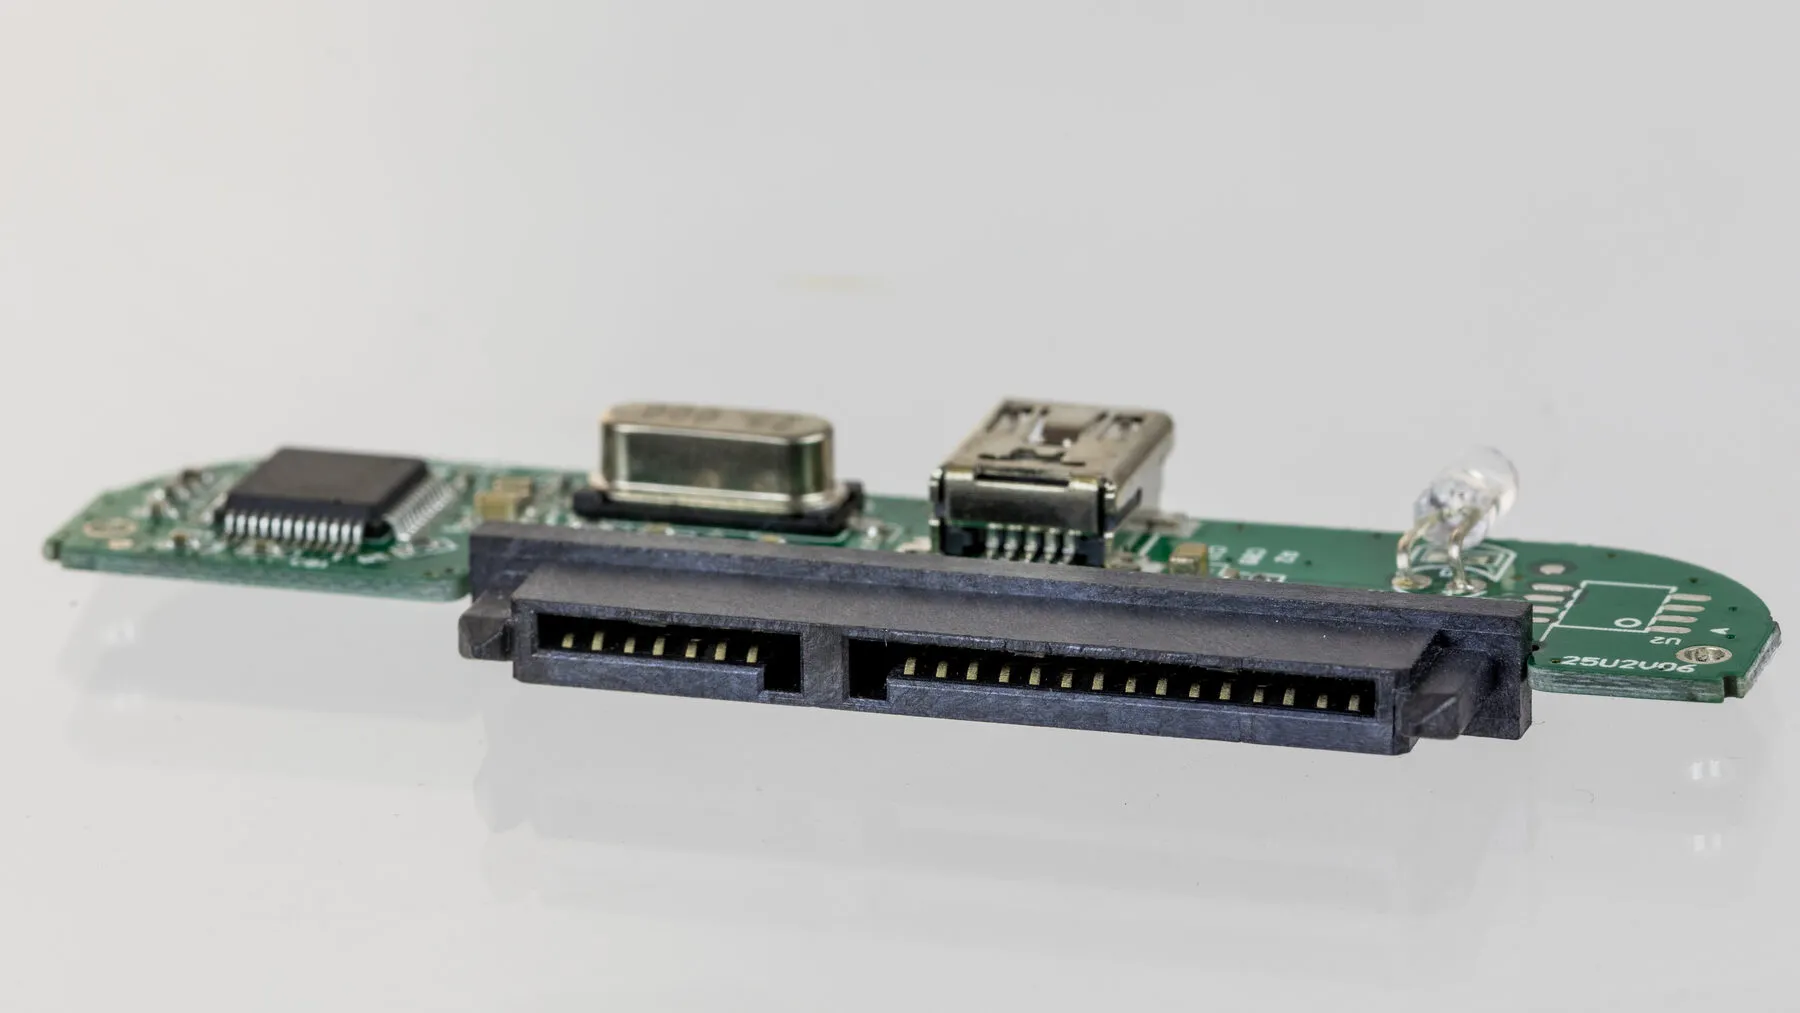
Inside a USB-SATA adapter (an old USB 2 one, not mine). The square chip on the left is the USB-to-SATA bridge, here an Initio INIC-1618L. That chip decides how the adapter behaves, and listings rarely name it. Photo: Raimond Spekking, CC BY-SA 4.0, via Wikimedia Commons.

My adapter’s listing didn’t name its chip. I’d assumed an ASMedia (ASM1153E or ASM235CM, often recommended for the Pi). Both of my UGREEN adapters turned out to be Realtek RTL9201. It wasn’t the chip I expected, and it caused all the trouble below. In the SSH app:
for d in /sys/bus/usb/devices/*; do [ -f "$d/idVendor" ] && echo "${d##*/} $(cat "$d/idVendor"):$(cat "$d/idProduct") $(cat "$d/speed") Mb/s $(cat "$d/product" 2>/dev/null)"donels /sys/bus/usb/drivers/uas/ /sys/bus/usb/drivers/usb-storage/Mine showed 0bda:9201, 5000 Mb/s, “UGREEN Storage Device”, with its interface under uas. The first list gives the vendor and product ID you need below; the second shows which driver has the disk.
UAS (USB Attached SCSI) queues many commands at once; the older usb-storage driver handles one at a time. Linux uses UAS whenever an adapter offers it, unless the kernel has a quirk entry for the chip, and it has none for the RTL9201. For three days that was fine.
The night the disk went offline
Section titled “The night the disk went offline”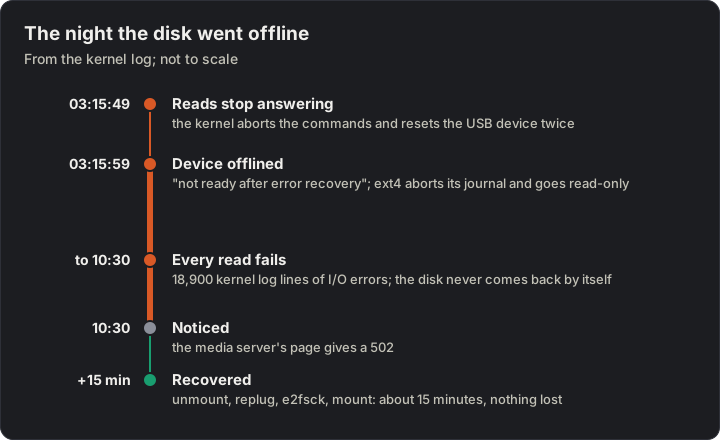
The incident, from the kernel log.
At 03:15:49 the adapter stopped answering a batch of reads while my media server was reading. The kernel reset the USB device twice (uas_eh_device_reset_handler), then gave up: Device offlined - not ready after error recovery. ext4 aborted its journal and went read-only, and every read failed until I noticed at 10:30.
It wasn’t power: get_throttled was still 0x0 (it keeps the undervoltage flags since boot) and the input read 5.12 V. It wasn’t the drive: SMART passed afterwards, with no errors logged, no CRC errors and no reallocated sectors. A power dip shows up as a USB disconnect. This was commands timing out on a link that stayed up.
An offlined disk never comes back by itself. Recovery took about 15 minutes:
- Stop every app that uses the disk.
- Drop the dead host mount:
host umount -l /mnt/data/supervisor/media/usb. The lazy unmount also clears it from every app that mapsmedia. - Unplug the adapter, wait 10 seconds, plug it back into the same port. Mine came back as
/dev/sdainstead of/dev/sdc, which is why everything here mounts by label. - Check the filesystem from a privileged container:
docker run --rm --privileged --entrypoint sh "$IMG" -c 'apk add -q e2fsprogs && e2fsck -fp /dev/sda1'. It replayed the journal and fixed the free-block count (exit code 1 means “errors fixed”). Nothing went tolost+found. - Mount it again (step 6) and start the apps.
Step 4: Turn UAS off for the adapter
Section titled “Step 4: Turn UAS off for the adapter”Turning UAS off is a trade-off, but one I had to make: usb-storage can’t queue commands, so some tests get slower (measured below).
The fix is a usb-storage quirk on the kernel command line: usb-storage.quirks=VID:PID:u, where u means “don’t bind to the uas driver”. On HAOS the command line is cmdline.txt on the boot partition, which the host mounts at /mnt/boot. The firmware reads it because config.txt has cmdline=/cmdline.txt. It’s one line, and the quirk goes at the start:
host cat /mnt/boot/cmdline.txthost cp /mnt/boot/cmdline.txt /mnt/boot/cmdline.txt.bakhost sed -i '1s/^/usb-storage.quirks=0bda:9201:u /' /mnt/boot/cmdline.txthost cat /mnt/boot/cmdline.txtha host rebootUse your adapter’s ID from step 3. Several adapters share one parameter, comma-separated: usb-storage.quirks=aaaa:bbbb:u,cccc:dddd:u. If you’d rather not edit it live, it’s on the small FAT partition of the SD card, which any PC can open. After the reboot:
grep -o 'usb-storage.quirks=\S*' /proc/cmdlinehost dmesg | grep -i uasls /sys/bus/usb/drivers/usb-storage/The kernel log should say UAS is ignored for this device, using usb-storage instead, and the adapter’s interface (2-1:1.0 on mine) is now under usb-storage.
Step 5: Turn the cache flushes back on
Section titled “Step 5: Turn the cache flushes back on”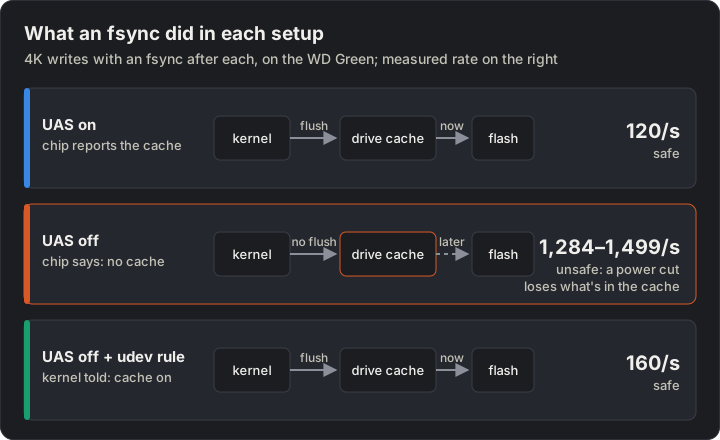
What an fsync did in each setup, with the measured rates.
With UAS off, the disk was stable, but there’s a second, quieter problem. SATA drives have a write cache: they say “done” once the data is in their RAM, and write it to flash a moment later. When a program calls fsync, or ext4 commits its journal, Linux sends the drive a flush (SYNCHRONIZE CACHE), so the data is really on flash before fsync returns. Linux only sends flushes to disks it believes have a write cache.
In usb-storage mode the kernel doesn’t ask the bridge for the drive’s caching page directly: the driver skips that request, because many USB bridges choke on it. It asks for all pages at once and takes the bridge’s answer. The RTL9201 answers that the write cache is off, while the drive keeps it on. So Linux never flushes, an fsync can return while the data still sits in the drive’s cache, and a power cut loses it. That matters most for a database.
Check both sides:
docker run --rm --privileged --entrypoint sh "$IMG" -c \ 'apk add -q smartmontools && smartctl -g wcache -d sat /dev/sda'host sh -c 'cat /sys/block/sda/device/scsi_disk/*/cache_type'The drive said its write cache was enabled; the kernel said write through. The benchmark gives it away too: 4K writes with an fsync after each ran at 120 a second with UAS, and at up to 1,499 a second without. Nothing gets ten times faster at that by changing USB protocol; the flushes had stopped.
The fix is a udev rule that tells the kernel the cache is on:
ACTION=="add|change", SUBSYSTEM=="scsi_disk", ATTRS{idVendor}=="0bda", ATTRS{idProduct}=="9201", ATTR{cache_type}="temporary write back"temporary changes only the kernel’s view and sends nothing to the drive (kernel docs). The kernel just starts flushing again. On HAOS, /etc/udev/rules.d/ is on the overlay partition and survives updates. The SSH app’s /media is the host’s /mnt/data/supervisor/media, so the file can travel that way:
curl -fsS -o /media/99-usb-sata-write-cache.rules \ https://blog.jacq.cc/usb-ssd-pi5/99-usb-sata-write-cache.ruleshost cp /mnt/data/supervisor/media/99-usb-sata-write-cache.rules /etc/udev/rules.d/rm /media/99-usb-sata-write-cache.ruleshost udevadm control --reloadhost udevadm trigger --subsystem-match=scsi_diskhost sh -c 'cat /sys/block/sda/device/scsi_disk/*/cache_type'The last line should now say write back. Download the rule file (MIT licensed) to read it first. It has a line for my adapter and one for the 2 TB disk below; change the IDs to yours, one line per drive. With flushes back, the fsync test ran at 160 a second, a little faster than with UAS. The kernel also has a quirk flag meant for this, y (as in usb-storage.quirks=0bda:9201:uy), but I haven’t tried it.
Speed before and after
Section titled “Speed before and after”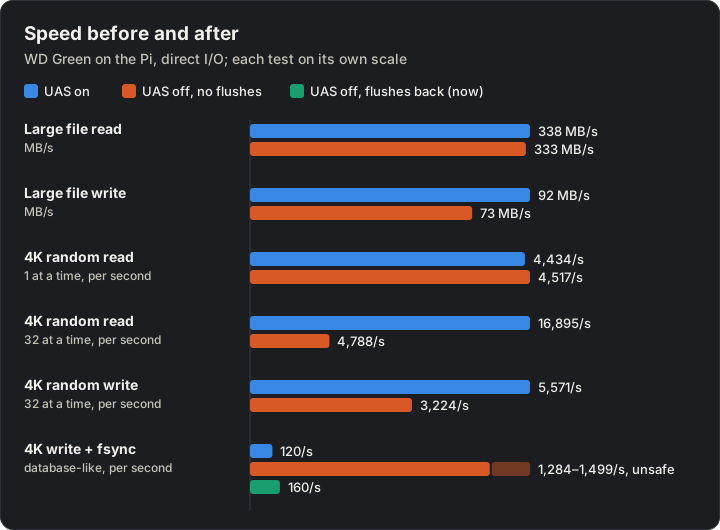
The WD Green on the Pi, each test on its own scale. Reads didn’t change once flushes came back.
Measured with dd and fio: reads on the raw disk, writes to a 2 GB test file on the ext4. Large files and one-at-a-time access don’t change, and the Pi’s 1 Gb/s network (about 110 MB/s) is slower than any of these anyway. Only many requests at once lose, about 3.5× on random reads, because usb-storage can’t queue. Database-style writes are as fast as with UAS once the flushes are back. No loss that matters.
Step 6: Mount it where apps can see it
Section titled “Step 6: Mount it where apps can see it”I erased the disk (blkdiscard), made one GPT partition and formatted it with a label and no reserved blocks (mkfs.ext4 -L media -m 0), from a privileged container like the e2fsck one above. Always mount by label, because the sdX letters move. And name the label after the job, not the disk: when my media later moved to a bigger disk, that disk took over the label and no app needed changing.
There are two ways for apps to reach the disk, and I use both.
Apps that mount it themselves. Some apps, such as the alexbelgium ones, have a localdisks option. Set it to the label (localdisks: media) and the app mounts the disk at /mnt/media in its own container. My media server works this way. Two catches. If the disk is missing when the app starts, the app writes into its own container instead, so check its log after any USB change. And the lookup matches any label that merely contains the name, so never give another disk a label like media-old.
A host mount for everything else. File Explorer and Home Assistant’s media browser only see HA’s shared folders. A disk mounted on the host at /mnt/data/supervisor/media/usb appears in every app that maps media, as /media/usb. The core of my mount script, with IMG and host() from step 1 above it:
LABEL=mediaHOST_DIR=/mnt/data/supervisor/media/usb   # the mount point, on the data diskDIR=/media/usb                            # the same folder, seen from the apps
mountpoint -q "$DIR" && exit 0host blkid -L "$LABEL" >/dev/null || { echo "disk $LABEL missing" >&2; exit 1; }host sh -c "mkdir -p '$HOST_DIR' &&  { mountpoint -q '$HOST_DIR' || chattr +i '$HOST_DIR'; } &&  { mountpoint -q '$HOST_DIR' || mount -o noatime LABEL='$LABEL' '$HOST_DIR'; }"
Save it as /homeassistant/media-mount.sh and run it every time the SSH app starts, from the app’s init_commands option:
init_commands: - bash /homeassistant/media-mount.sh || trueThe || true matters: the app runs each init command with eval, and a failing one stops the SSH app.
The chattr +i is the guard. It makes the empty mount point immutable before anything is mounted on it. If the disk is missing, /media/usb is an empty folder nothing can write to (Operation not permitted), so a download or upload can’t quietly fill Home Assistant’s own disk. Once the disk is mounted, you see the disk’s root instead and the flag doesn’t get in the way. Set it only while unmounted, or chattr hits the disk’s root. Mounting one ext4 twice on the same kernel, once by an app and once on the host, is safe: both mounts share one superblock, like a bind mount.
Step 7: Make the SSD Home Assistant’s data disk
Section titled “Step 7: Make the SSD Home Assistant’s data disk”After the night it went offline, I wanted Home Assistant itself on the SSD: it’s the healthy drive, it takes the constant small writes off the SD card, and HA can’t carry on without its disk. HAOS has this built in, Settings → System → Storage → ⋮ → Move data disk, but it moves everything (config, database, apps, backups, /share, /media) and overwrites the target. So the media had to move off the SSD first.
Move the media to a second disk
Section titled “Move the media to a second disk”It went to a WD Elements Portable 2 TB USB hard drive (1058:1048, WD’s own USB chip, plain usb-storage).
- Power. I had a USB hub with its own charger ready, but tried the drive straight on the Pi’s other blue port first. Its spin-up next to the running SSD was clean, and a minute into a full-disk write the Pi still read
0x0at 5.08 V, so it stayed there. If the Pi ever cuts USB power, both drives drop, so Home Assistant pushes an alert on undervoltage or when the kernel’sover_current_countfor any USB port goes up. So far the monitoring shows the power is stable. Still, two drives sharing 1.6 A doesn’t leave much headroom, so I plan to move them to a powered hub. - Cache. Its chip hides the drive’s write cache too (
Assuming drive cache: write through), so it got its own line in the udev rule before it held anything. - Health. SMART showed one pending sector, so I started a full zero-fill: writing the sector makes the drive fix or replace it. By 300 GB it was fixed, but the drive had reached 58–59 °C in its plastic case (WD’s limit is 60 °C), so I stopped there.
- Copy.
mkfs.ext4 -m 0 -T largefile(one inode per MiB, which saves about 7 GB of inode tables), thenrsync -aHAXwith the apps stopped. To read the SSD in a container while the host still had it mounted read-write, mount it and thenmount -o remount,bind,ro: a plain-o romount fails with “Resource busy”. - Swap the labels with
e2label, refresh them withudevadm trigger --action=change --subsystem-match=blockand run the mount script again. The apps found the 2 TB with no change, and a reboot brought everything back by label.
Move the data disk
Section titled “Move the data disk”Make a full backup, then Move data disk and pick the SSD. Supervisor partitions it and reboots. At boot, HAOS copies the data partition with e2image -ra -p (only the used blocks: about 6 minutes for my 16.6 GB) and renames the old one on the SD card hassos-data-old. Home Assistant was down for about 8 minutes, and came back with every app as it was.
Nothing from this guide needed redoing. cmdline.txt and the udev rule live on the SD card’s boot and overlay partitions, not on the data partition. The chattr +i mount point came along with the copy, and the 2 TB mounted inside it didn’t: e2image copies the filesystem, not what’s mounted on it.
If the SSD dies, Home Assistant won’t start. Until I wipe the SD card’s old partition, relabelling it hassos-data (e2label, on a PC) and restoring the newest backup gets it back. After that, it’s a fresh install and a restore from the off-site backup.
How it turned out
Section titled “How it turned out”I’m happy with it. The 2 TB disk holds the things that aren’t critical, like movies and photos. The SSD holds what matters: Home Assistant’s data and its backups. That leaves the SD card with just the system, so it gets far fewer writes.
Both drives have SMART monitoring, so I should see a failure coming. Their wear levels are fine for now, and I’m keeping a close eye on them.
Sources
Section titled “Sources”- Raspberry Pi documentation: Power supply and USB (1.6 A vs 600 mA, USB boot on a 3 A supply,
/proc/device-tree/chosen/power,pmic_read_adc) - Raspberry Pi forums: USB 3 SSDs and the UAS quirk
- Linux kernel:
usb-storage.quirks,cache_type, and scsiglue.c, where usb-storage skips the caching mode page - Home Assistant OS: configuration (
cmdline.txt, persistent udev rules) and using an external data disk - Advanced SSH & Web Terminal (Docker API,
init_commands) - alexbelgium apps: mounting local drives (
localdisks)
Change history
- : First published.
This guide as plain Markdown, for LLMs and scripts: usb-ssd-raspberry-pi-5-home-assistant-os.md. All posts: API and Markdown.
Text, photos and drawings: CC BY 4.0. Code: MIT. Share and adapt them, crediting HomeLab Guides (blog.jacq.cc). Licence and privacy