
Guide
Reach Home Assistant, Vaultwarden and Gitea from anywhere with your own client certificates
Published · Updated
I wanted Home Assistant on my phone away from home, in the car too, without switching on a VPN. The usual answers didn’t fit. A Cloudflare tunnel decrypts every request, so Cloudflare would see every login and my phone’s location. An always-on WireGuard VPN drains the battery, and my family wouldn’t use it. The HA Android app can’t add a secret header for the proxy to check (a long-standing request), and HA has no built-in passkeys. What the app does support is a client certificate: mutual TLS (mTLS), where the phone proves who it is during the TLS handshake, before a single HTTP byte reaches Home Assistant. So I forwarded one port to the Nginx Proxy Manager (NPM) that already ran on my Pi, made a small certificate authority (CA) of my own, and added one nginx rule. A day later Vaultwarden and Gitea went behind the same rule. I couldn’t find all three behind one proxy written up anywhere, and Vaultwarden with client certificates barely at all.
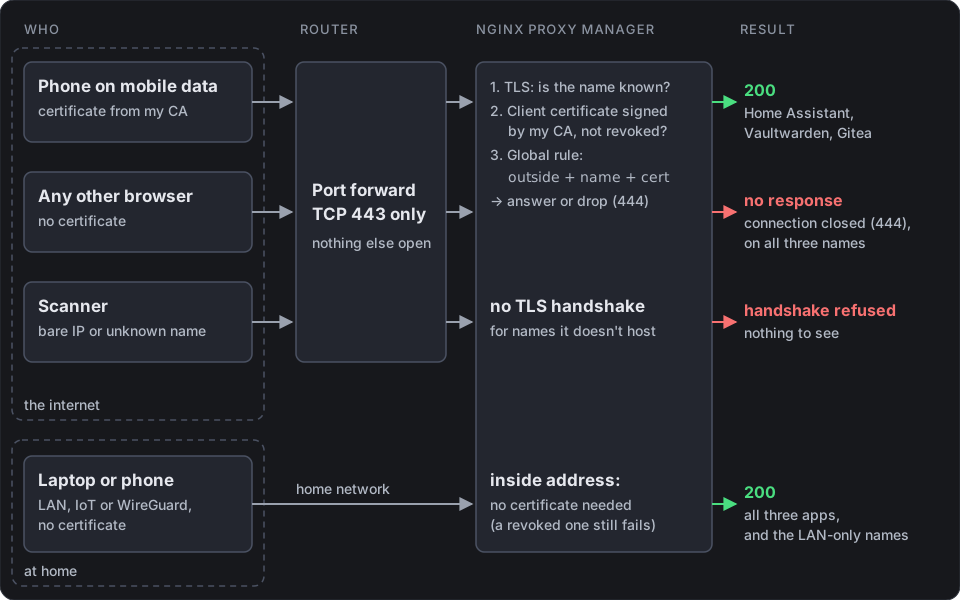
Who gets what. The router forwards one port, and Nginx Proxy Manager decides everything else.
What you need
Section titled “What you need”| Part | Mine |
|---|---|
| A router that forwards one port | EdgeRouter X SFP: TCP 443 to the Pi, nothing else |
| Nginx Proxy Manager | The HA app, on a Raspberry Pi 5 running Home Assistant OS |
| A certificate for your public names | Let’s Encrypt wildcard *.example.com, ECDSA, by DNS challenge, renewed by NPM |
| DNS that doesn’t proxy | Cloudflare, DNS-only CNAMEs to a dynamic DNS name |
| OpenSSL 3 on a laptop | For the CA. Its key never leaves the laptop |
| A shell on the Pi | The Advanced SSH & Web Terminal app, to place files and reload nginx |
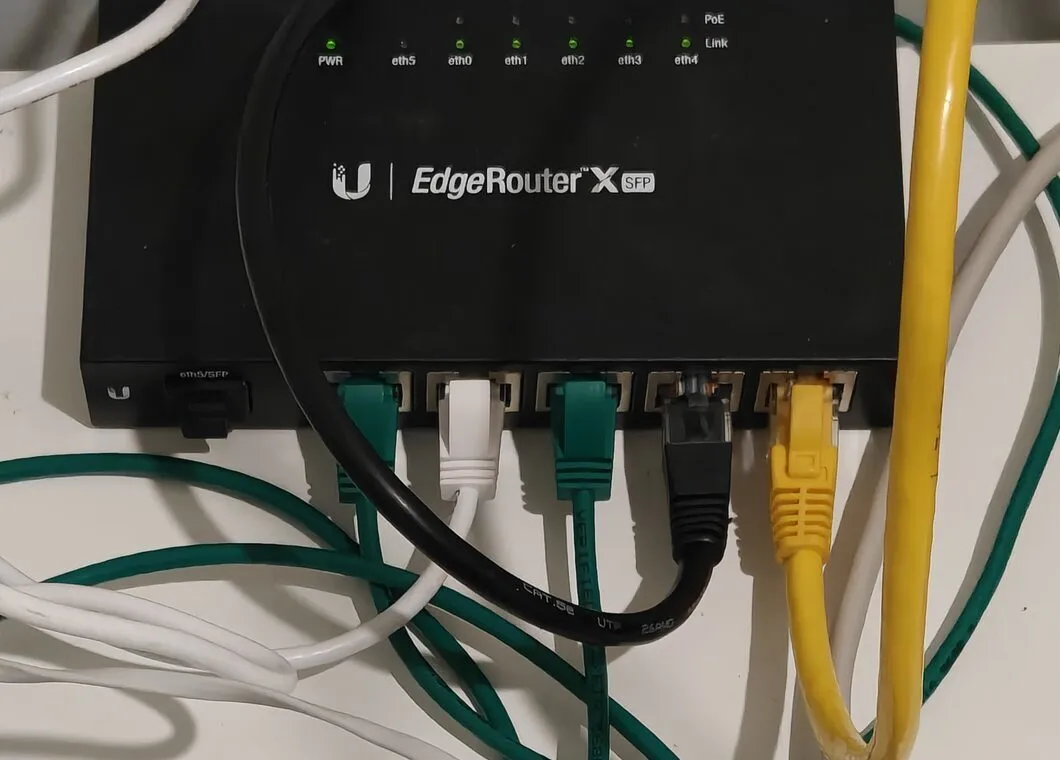
My router. It forwards TCP 443 to the Pi; the only other open port is my WireGuard VPN.

The Pi 5 runs Home Assistant OS, and NPM runs on it as an app. Photo: SparkFun Electronics, CC BY 2.0, via Wikimedia Commons.

Step 1: Forward one port, and keep DNS out of the way
Section titled “Step 1: Forward one port, and keep DNS out of the way”- Router: forward WAN TCP 443 to the Pi’s port 443. No port 80: the server certificate comes by DNS challenge.
- DNS: a CNAME for each public name (
hass,vault,git) to your dynamic DNS name, with the proxy off (“DNS only” in Cloudflare). A proxy ends TLS at its own servers, so the client certificate never reaches NPM. - NPM: a proxy host for each name, with Force SSL, HTTP/2 and websockets on, and HSTS on with subdomains off. I leave Block Common Exploits off: it’s a list of URL patterns that protects nothing here, once the rule below decides who gets in.
My NPM’s default server refuses the TLS handshake (ssl_reject_handshake on) for any name it doesn’t host, so a scan of the IP address shows nothing.
Step 2: Make your own certificate authority
Section titled “Step 2: Make your own certificate authority”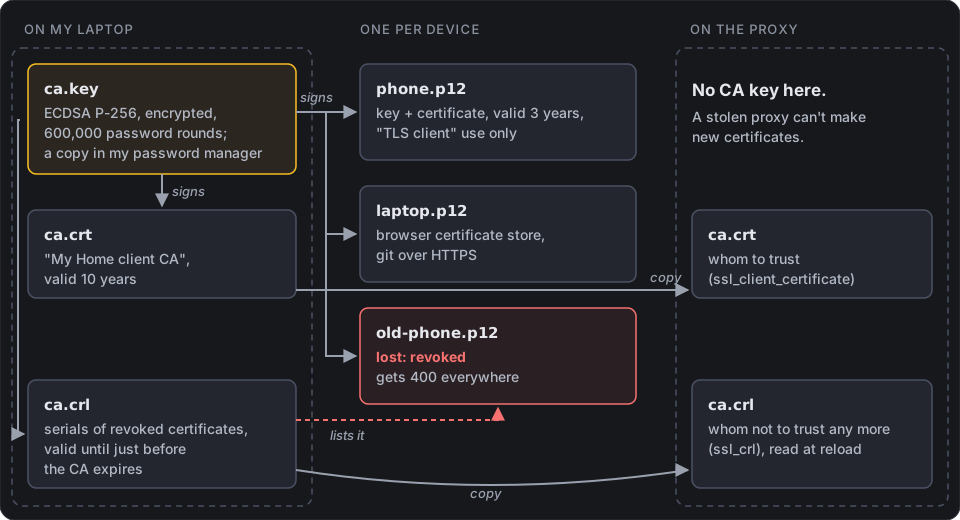
What lives where. A stolen Pi can’t make new certificates, because the CA key isn’t on it.
All of this runs on the laptop, in a folder only you can read (mkdir -m 700 ~/certs && cd ~/certs). First the CA: an ECDSA P-256 key, encrypted with 600,000 password rounds, and a certificate valid for 10 years that may only sign client certificates:
openssl genpkey -algorithm EC -pkeyopt ec_paramgen_curve:P-256 \ | openssl pkcs8 -topk8 -v2 aes-256-cbc -v2prf hmacWithSHA256 -iter 600000 -out ca.keyopenssl req -new -x509 -key ca.key -sha256 -days 3650 \ -subj "/O=My Home/CN=My Home client CA" \ -addext "basicConstraints=critical,CA:TRUE,pathlen:0" \ -addext "keyUsage=critical,keyCertSign,cRLSign" -out ca.crtThen one certificate per device, good for TLS client logins only, valid for 3 years:
cat > client.ext <<'EOF'basicConstraints = critical, CA:FALSEkeyUsage = critical, digitalSignatureextendedKeyUsage = clientAuthEOFn=phoneopenssl genpkey -algorithm EC -pkeyopt ec_paramgen_curve:P-256 -out $n.keyopenssl req -new -key $n.key -subj "/O=My Home/CN=$n" -out $n.csropenssl x509 -req -in $n.csr -CA ca.crt -CAkey ca.key -days 1095 -sha256 \ -extfile client.ext -out $n.crtopenssl pkcs12 -export -iter 600000 -inkey $n.key -in $n.crt -certfile ca.crt \ -name "My Home $n" -out $n.p12- Why
-iter 600000: OpenSSL’s default for a.p12is 2,048 password rounds, which makes guessing the password of a stolen file cheap. 600,000 makes each guess about 300 times slower. git reads my 600,000-round file fine; my phone got its file before I made the change. - Keep every
.crt. Revoking a certificate later needs its file (step 6). - The
.p12holds the device’s private key. Once a device has it, delete the loose.keyand.p12, or keep them only in a password manager. A copy of the CA key lives there too.
To give an older .p12 the stronger setting, export it again. OpenSSL 3.6 needs the certificate and the key in two separate pipes; with one, it fails with “Could not find certificates”:
openssl pkcs12 -export -iter 600000 -name "My Home laptop" -out new.p12 \ -in <(openssl pkcs12 -in old.p12 -nokeys) \ -inkey <(openssl pkcs12 -in old.p12 -nocerts -nodes)Step 3: Give NPM the CA certificate and a revocation list
Section titled “Step 3: Give NPM the CA certificate and a revocation list”nginx checks revocations against a certificate revocation list (CRL) signed by the CA. Make an empty one now, so the hosts can load it from the start. Its expiry matters: when a CRL expires, nginx rejects every certificate. So make it valid until just before the CA itself expires:
cat > ca-crl.cnf <<'EOF'[ ca ]default_ca = home_ca
[ home_ca ]database    = index.txtcrlnumber   = crlnumbercertificate = ca.crtprivate_key = ca.keydefault_md  = sha256EOFtouch index.txt; echo 01 > crlnumberca_end=$(date -ud "$(openssl x509 -in ca.crt -noout -enddate | cut -d= -f2)" +%s)days=$(( (ca_end - $(date -u +%s)) / 86400 - 3 ))openssl ca -config ca-crl.cnf -gencrl -crldays $days -out ca.crl
Copy ca.crt and ca.crl to the Pi, into /addon_configs/a0d7b954_nginxproxymanager/mtls/, which NPM sees as /config/mtls/. Then paste this into the Advanced tab of each of the three proxy hosts:
ssl_client_certificate /config/mtls/ca.crt;ssl_verify_client optional;ssl_crl /config/mtls/ca.crl;optional means nginx asks for a certificate and checks any it gets, but lets a request without one through to the next step. The rule in step 4 then decides who needs one.
Step 4: One rule for every host
Section titled “Step 4: One rule for every host”NPM loads two custom files if they exist: http_top.conf once, at the top of nginx’s http block, and server_proxy.conf in every proxy host, new ones too. That makes them the right place for one rule that covers everything, instead of an Access List on each host that’s easy to forget on the next one. On the Pi they live in /addon_configs/a0d7b954_nginxproxymanager/nginx/custom/. First http_top.conf:
# Which networks count as home. Use your own subnets.geo $outside {    default          1;    127.0.0.0/8      0;    192.168.50.0/24  0;  # LAN (hairpin NAT visitors show up as the router)    192.168.60.0/24  0;  # IoT    10.20.30.0/24    0;  # WireGuard}
# Key: outside:name:certificate result (NONE, SUCCESS or FAILED:...)map "$outside:$host:$ssl_client_verify" $block {    default                         0;    "1:hass.example.com:SUCCESS"    0;    "1:vault.example.com:SUCCESS"   0;    "1:git.example.com:SUCCESS"     0;    "~^1:"                          1;}
Then server_proxy.conf:
if ($block) { return 444;}Reload NPM from the SSH app with sudo docker exec app_a0d7b954_nginxproxymanager sh -c 'nginx -t && nginx -s reload'.
From home, $outside is 0, so the map never blocks: no certificate is needed, and LAN-only names work as before. From outside, a request gets through only on one of the three public names, and only with a certificate nginx verified. Everything else gets 444, nginx’s code for “close the connection without an answer”. A browser shows “didn’t send any data”, and a scanner learns nothing.
Three details. NPM sees each visitor’s real address, since nothing proxies in front of it, so the rule can trust it. Hairpin NAT visitors (a phone at home using the public name) reach NPM from the router’s LAN address, so they count as home. And I left HAOS’s internal Docker network, 172.30.32.0/23, out of the home list on purpose: outside IPv6 connections can arrive from its gateway through Docker’s userland proxy. The side effect is that apps on that network get 444 too; Home Assistant and the SSH app use the host network, so they’re fine.
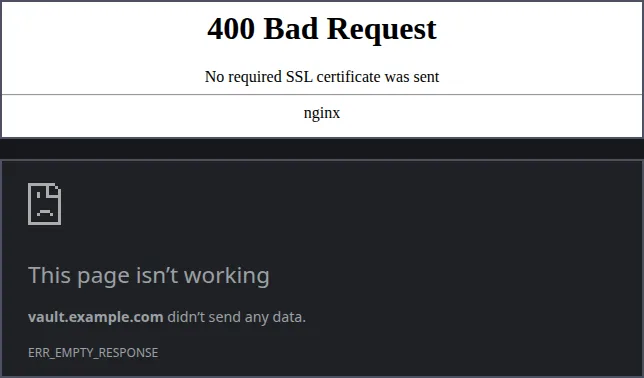
Top: ssl_verify_client on. Bottom: optional plus the rule. Both from a local test with example names.
Why optional and not on: my Home Assistant host started with on. nginx then answers a missing certificate with its own 400 page, before any rule runs. That page tells a scanner there’s a server behind the name, and at home it wanted a certificate too. Since 14 October all three hosts use optional, and outsiders without a certificate get no answer at all. A bad certificate (revoked, or from another CA) still gets 400, even at home: optional only lets through requests with no certificate.
What each case gets, tested from a real outside network (my laptop at work, whose split-tunnel WireGuard sends the public IP over the internet) and again in a local nginx:alpine container with throwaway certificates:
| Request | Answer |
|---|---|
| From outside, no certificate | Nothing (444) |
| From outside, my certificate | 200, and websockets work (101) |
| From outside, revoked or another CA’s certificate | 400 |
| At home (LAN, IoT, WireGuard, hairpin NAT), no certificate | 200 |
| At home, revoked certificate | 400 |
| From outside, a LAN-only name, even with my certificate | Nothing (444) |
| From outside, an unknown name or the bare IP | TLS handshake refused |
One name in SNI, another in the Host header |
421, or nothing |
An outside port scan found every TCP port filtered except 443, and nmap graded the TLS setup A: TLS 1.3, plus TLS 1.2 with ECDHE and AES-GCM or ChaCha20 only.
Step 5: Put a certificate on each device
Section titled “Step 5: Put a certificate on each device”The Home Assistant Android app. Copy the phone’s .p12 to it over USB, then in Android’s Settings search for Install a certificate and pick VPN & app user certificate, and type the file’s password. In the app, set the External URL to https://hass.example.com, and the Internal URL to your home name for your home Wi-Fi. The first time it connects, Android asks which certificate to use (the app’s docs). Mine has worked on mobile data since 7 October, with Wi-Fi off. Delete the copy in the phone’s Download folder afterwards.
Browsers on Linux. Chrome and Brave use the NSS store in your home folder. pk12util comes with the libnss3-tools package:
pk12util -d sql:$HOME/.pki/nssdb -i laptop.p12Restart the browser. When a site asks for a certificate, Chrome and Brave let you pick one from that store.
Bitwarden, for Vaultwarden. The iOS and Android apps can now upload a client certificate for a self-hosted server (release notes): log out, choose Self-hosted, enter https://vault.example.com and import the .p12 there. The desktop app has no such option, so use the browser extension. If the web vault opens but the extension can’t connect, the extension can’t show the certificate prompt. Then the browser policy AutoSelectCertificateForUrls picks the certificate by its issuer: a JSON file in /etc/brave/policies/managed/ (Chrome: /etc/opt/chrome/policies/managed/):
{ "AutoSelectCertificateForUrls": [ "{\"pattern\":\"https://vault.example.com\",\"filter\":{\"ISSUER\":{\"CN\":\"My Home client CA\"}}}" ]}Also set Vaultwarden’s DOMAIN to the public URL: it needs it for passkey two-factor logins, attachment links and Sends. And turn signups off.
git, for Gitea. git can send a password-protected .p12, and only to the one URL that needs it:
[http "https://git.example.com/"] sslCert = ~/certs/laptop.p12 sslCertType = P12 sslCertPasswordProtected = true[credential] helper = p12git then asks its credential helpers for the .p12 password, with protocol=cert and path= the file. A URL-scoped [credential "cert://…"] section never matches that request, because it has no host, so it takes a small helper. Mine reads the password from KDE Wallet; save it as git-credential-p12 on your PATH:
#!/bin/bash# Answers git's request for the .p12 password from KDE Wallet; silent for everything else.P12="$HOME/certs/laptop.p12"protocol='' path=''while IFS='=' read -r key value; do [ -z "$key" ] && break case "$key" in protocol) protocol=$value ;; path) path=$value ;; esacdone[ "$1" = get ] && [ "$protocol" = cert ] && [ "$path" = "$P12" ] || exit 0pass=$(kwallet-query -r p12-laptop -f home kdewallet 2>/dev/null) && [ -n "$pass" ] \ && printf 'password=%s\n' "$pass"exit 0The Gitea login itself is an access token, not the password, since the account has two-factor login on. My git uses libcurl with GnuTLS, which reads .p12 files. Git over SSH stays at home and on WireGuard: I didn’t open an SSH port. And Gitea passkeys only work on the one name in Gitea’s DOMAIN setting (WebAuthn ties them to it), so make the public name Gitea’s main name.
Step 6: Revoke a lost phone
Section titled “Step 6: Revoke a lost phone”On the laptop: revoke the certificate, make a new CRL with the same long validity, copy it to the Pi and reload nginx. nginx reads the CRL only when it starts or reloads.
cd ~/certsopenssl ca -config ca-crl.cnf -revoke phone.crt -crl_reason keyCompromiseca_end=$(date -ud "$(openssl x509 -in ca.crt -noout -enddate | cut -d= -f2)" +%s)days=$(( (ca_end - $(date -u +%s)) / 86400 - 3 ))openssl ca -config ca-crl.cnf -gencrl -crldays $days -out ca.crlThen on the Pi, put the new ca.crl in place of the old one and run the same reload as in step 4. The revoked phone now gets 400 on all three names, at home too. Check that a good certificate still gets 200, because a broken or expired CRL shows up as 400 for everyone:
curl --cert-type P12 --cert laptop.p12:<password> -o /dev/null -w '%{http_code}\n' \ https://hass.example.com/manifest.jsonThe certificates were signed with openssl x509 -req, not openssl ca, so index.txt lists only the revoked ones. That’s why -revoke needs the certificate’s .crt file. Give the phone a new certificate with a new name, like phone-2. I revoked one unused certificate this way on 11 October, and checked that all three names refused it.
Around it
Section titled “Around it”- Home Assistant login bans:
login_attempts_thresholddefaults to-1, which never bans. I set 5. Visitors through hairpin NAT all share the router’s address, though, so one ban locks out the whole house until you delete the entry inip_bans.yamland restart HA. - HA 2026.9 ignores
http:in YAML. HTTP settings now live in.storage/http. Change them over the websocket API:http/config/configurewith the full config, thenhttp/config/promotewithin 5 minutes, or HA restarts again on the old settings. - Trusted proxy: HA needs
use_x_forwarded_forwith NPM’s container network (172.30.33.0/24on HAOS) as a trusted proxy, or it sees every visitor as NPM. - Two-factor login on every HA account that can log in from outside. A certificate proves the device, not the person holding it.
Sources
Section titled “Sources”- nginx: ssl module (
ssl_verify_client,ssl_client_certificate,ssl_crl,ssl_reject_handshake), geo and map - Home Assistant companion app: TLS client authentication; HA HTTP integration (trusted proxies, login bans); the request for custom headers in the app
- Bitwarden release notes (client certificates in the iOS and Android apps)
- Chrome Enterprise policy
AutoSelectCertificateForUrls - git:
http.sslCert,http.sslCertType,http.sslCertPasswordProtected
Change history
- : First published.
This guide as plain Markdown, for LLMs and scripts: client-certificates-home-assistant-vaultwarden-gitea.md. All posts: API and Markdown.
Text, photos and drawings: CC BY 4.0. Code: MIT. Share and adapt them, crediting HomeLab Guides (blog.jacq.cc). Licence and privacy